こんにちは。BASE BANK 株式会社 Dev Division にて、 Software Developer をしている東口(@hgsgtk)です。
BASE 株式会社では、New Relic 株式会社のプレスリリースで発表されている通りオブザーバビリティプラットフォーム「New Relic One」を導入しています。
私が所属している BASE BANK 株式会社のプロダクトチームでも New Relic One を活用しています。当チームでは AWS や GCP などのインフラ構成管理に Terraform を利用しております。New Relic One での設定情報も Terraform でのコード管理をすると次のような利点が得られて便利です。
- 設定内容がコードとして可視化される
- 意図しない設定変更を切り戻したい場合に Terraform の機能で戻しやすい
当記事で紹介する内容は New Relic One 特有なものもありますが、3rd Party 製の Terraform Provider を利用する際に一般的に当てはまる内容も含みます。具体的に紹介する内容は下記となります。
TerraformのNew Relic Providerを使う
New Relic を Terraform 管理するための New Relic Provider が用意されています。
https://registry.terraform.io/providers/newrelic/newrelic/latest/docs
具体的な始め方はGetting Started with the New Relic Providerにて解説されています。当記事では CI/CD Pipeline の用意等工夫点があった箇所をピックアップして紹介します。
当記事で前提するアカウント体系とディレクトリ構成
BASE BANK チームでは次の 3 つのアカウントを用意して New Relic One を活用しています。
- BASEBANK-production
- BASEBANK-staging
- BASEBANK-development
環境ごとに 3 つのアカウントを用意しています。Terraform のディレクトリ構成としては環境ごとにサブディレクトリを切る構成としています。
.
├── dev // BANK-development
├── modules // 全環境共通モジュール
├── prd // BANK-production
└── stg // BANK-staging
ディレクトリ構成の特徴としては、
- 環境ごとにディレクトリを分け tfstate も環境ごとに持つ
- module を利用し環境共通の構成定義は module 内に定義する
といった点があげられます。
main.tf での初期設定
terraform initによって初期化し最初のmain.tfを用意しますが、ここでは次の内容が含まれます。
- required_provider として
newrelic/newrelicの定義 - tfstate の保管箇所の定義
- New Relic Provider の設定定義
terraform {
  required_version = "~> 0.14.3"

  # 1. required_providerとして`newrelic/newrelic`の定義
  required_providers {
    newrelic = {
      source  = "newrelic/newrelic"
      version = "~> 2.14.0"
    }
  }

  # 2. tfstateの保管箇所の定義
  backend "s3" {
    bucket  = "sample-bucket"
    key     = "terraform.tfstate"
    region  = "ap-northeast-1"
  }
}

# 3. New Relic Providerの設定定義
provider "newrelic" {
  account_id = var.account_id
}
variable "account_id" {
  type    = string
}
tfstate は AWS の S3 のバケットに保管しています。BASE BANK チームでは development/staging/production の 3 つの AWS アカウントを管理しているのでそれぞれのアカウントに tfstate のバケットを用意しています。
New Relic Provider の設定定義では New Relic の API Key を必要とします。
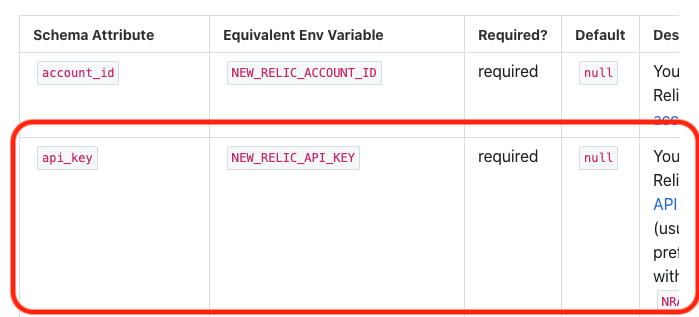
New Relic API Key は「Getting Started with the New Relic Provider」のガイダンスのとおりに作成します。
Terraform 実行時の参照方法は variable・環境変数の 2 つの方法がありますが、CI/CD 環境から注入しやすい点で環境変数 NEW_RELIC_API_KEY を利用しています。
ちなみにnewrelic/terraform-provider-newrelicの内部実装では下記の Provider 定義でこの挙動を実現しています。
   provider := &schema.Provider{
        Schema: map[string]*schema.Schema{
            // (省略)
            "api_key": {
                Type:        schema.TypeString,
                Optional:    true,
                DefaultFunc: schema.EnvDefaultFunc("NEW_RELIC_API_KEY", nil),
                Sensitive:   true,
            },
3rd party Providerを利用したmoduleを作成する際の注意点
Terraform の仕様はrequired_providersを省略した場合、registry.terraform.io/hashicorp/を参照することが仕様なため、hashicorp/newrelicを使おうとしてしまいます。
Note: If you omit the source argument when requiring a provider, Terraform uses an implied source address of registry.terraform.io/hashicorp/. This is a backward compatibility feature to support the transition to Terraform 0.13; in modules that require 0.13 or later, we recommend using explicit source addresses for all providers.
https://www.terraform.io/docs/configuration/provider-requirements.html#source-addresses
しかし、実態があるのはnewrelic/newrelicであるため、module を新規作成する際はそれぞれの module ごとに明示的に指定する必要があります。
terraform {
  required_providers {
    newrelic = {
      source = "newrelic/newrelic"
    }
  }
  required_version = ">= 0.14"
}
GitHub ActionsによるCI/CD Pipeline
ここからは、GitHub Action での CI/CD パイプラインを紹介します。特徴としては 2 点になります。
- Pull request を作成すると自動で PR コメントに Plan 結果が記録される
- main ブランチへマージしたタイミングで自動で Apply される
全量の GitHub Actions の yml ファイルを先に掲載いたします。
name: tfapply
on:
  push:
    paths-ignore:
      - 'docs/**'
    branches:
      - main
  pull_request:
    paths-ignore:
      - 'docs/**'

jobs:
  terraform-plan-apply:
    name: terraform plan apply

    strategy:
      matrix:
        env: [dev, stg, prd]

    runs-on: ubuntu-latest

    defaults:
      run:
        shell: bash

    steps:
      - name: Checkout
        uses: actions/checkout@v2

      - name: Terraform setup
        uses: hashicorp/setup-terraform@v1
        with:
          terraform_version: 0.14.3

      - name: Define Configuration
        id: config
        run: |
          if [[ ${{ matrix.env }} = 'dev' ]]; then
            echo ::set-output name=aws-access-key-id::${{ secrets.AWS_ACCESS_KEY_ID_DEV }}
            echo ::set-output name=aws-secret-access-key::${{ secrets.AWS_SECRET_ACCESS_KEY_DEV }}
            echo ::set-output name=new-relic-api-key::${{ secrets.NEW_RELIC_API_KEY_DEV }}
          elif [[ ${{ matrix.env }} = 'stg' ]]; then
            echo ::set-output name=aws-access-key-id::${{ secrets.AWS_ACCESS_KEY_ID_STG }}
            echo ::set-output name=aws-secret-access-key::${{ secrets.AWS_SECRET_ACCESS_KEY_STG }}
            echo ::set-output name=new-relic-api-key::${{ secrets.NEW_RELIC_API_KEY_STG }}
          elif [[ ${{ matrix.env }} = 'prd' ]]; then
            echo ::set-output name=aws-access-key-id::${{ secrets.AWS_ACCESS_KEY_ID_PRD }}
            echo ::set-output name=aws-secret-access-key::${{ secrets.AWS_SECRET_ACCESS_KEY_PRD }}
            echo ::set-output name=new-relic-api-key::${{ secrets.NEW_RELIC_API_KEY_PRD }}
          else
            echo 'unsupported matrix environment'
            exit 1
          fi

      - name: Configure AWS Credentials
        uses: aws-actions/configure-aws-credentials@v1
        with:
          aws-access-key-id: ${{ steps.config.outputs.aws-access-key-id }}
          aws-secret-access-key: ${{ steps.config.outputs.aws-secret-access-key }}
          aws-region: ap-northeast-1

      - name: Terraform fmt
        id: fmt
        run: terraform fmt -recursive -check
        continue-on-error: false

      - name: Terraform init
        id: init
        run: terraform init
        working-directory: ./${{ matrix.env }}

      - name: Terraform validate
        id: validate
        run: terraform validate -no-color
        working-directory: ./${{ matrix.env }}

      - name: Terraform lint
        uses: reviewdog/action-tflint@master
        with:
          github_token: ${{ secrets.github_token }}
          reporter: github-pr-review
          fail_on_error: true
          working_directory: ./${{ matrix.env }}

      - name: Terraform plan
        run: terraform plan -no-color
        id: plan
        working-directory: ./${{ matrix.env }}
        env:
          NEW_RELIC_API_KEY: ${{ steps.config.outputs.new-relic-api-key }}

      # https://github.com/hashicorp/setup-terraform#usage
      - uses: actions/github-script@v3
        if: github.event_name == 'pull_request'
        env:
          PLAN: "terraform\n${{ steps.plan.outputs.stdout }}"
        with:
          github-token: ${{ secrets.GITHUB_TOKEN }}
          script: |
            const output = `#### Terraform Format and Style 🖌\`${{ steps.fmt.outcome }}\`
            #### Terraform Initialization ⚙️\`${{ steps.init.outcome }}\`
            #### Terraform Validation 🤖${{ steps.validate.outputs.stdout }}
            #### Terraform Plan 📖\`${{ steps.plan.outcome }}\`

            <details><summary>Show Plan</summary>

            \`\`\`${process.env.PLAN}\`\`\`

            </details>

            *Pusher: @${{ github.actor }}, Action: \`${{ github.event_name }}\`, Working Directory: \`${{ matrix.env }}\`, Workflow: \`${{ github.workflow }}\`*`;

            github.issues.createComment({
              issue_number: context.issue.number,
              owner: context.repo.owner,
              repo: context.repo.repo,
              body: output
            })

      - name: Terraform apply
        if: github.event_name == 'push'
        run: terraform apply -auto-approve
        working-directory: ./${{ matrix.env }}
        env:
          NEW_RELIC_API_KEY: ${{ steps.config.outputs.new-relic-api-key }}

      - name: Slack notification (applying success)
        uses: rtCamp/action-slack-notify@v2
        if: ${{ github.event_name == 'push' && success() }}
        env:
          SLACK_USERNAME:  (${{ matrix.env }}) terraform-newrelic Automatic Applyer
          SLACK_ICON: # IconのURL
          SLACK_MESSAGE: Success to apply terraform-newrelic, check it!
          SLACK_COLOR: good
          SLACK_WEBHOOK: ${{ secrets.SLACK_WEBHOOK }}

      - name: Slack notification (applying failure)
        uses: rtCamp/action-slack-notify@v2
        if: ${{ github.event_name == 'push' && failure() }}
        env:
          SLACK_USERNAME: (${{ matrix.env }}) terraform-newrelic Automatic Applyer
          SLACK_ICON:  # IconのURL
          SLACK_MESSAGE: Failed to apply terraform-newrelic, check it!
          SLACK_COLOR: '#bd3232'
          SLACK_WEBHOOK: ${{ secrets.SLACK_WEBHOOK }}
この GitHub Actions の yml ファイルの前提として定義している secrets は以下です。
| KEY | 内容 |
|---|---|
| AWS_ACCESS_KEY_ID_DEV | dev 環境の AWS IAM User のアクセスキー |
| AWS_SECRET_ACCESS_KEY_DEV | dev 環境の AWS IAM User のアクセスシークレット |
| AWS_ACCESS_KEY_ID_STG | stg 環境の AWS IAM User のアクセスキー |
| AWS_SECRET_ACCESS_KEY_STG | stg 環境の AWS IAM User のアクセスシークレット |
| AWS_ACCESS_KEY_ID_PRD | prd 環境の AWS IAM User のアクセスキー |
| AWS_SECRET_ACCESS_KEY_PRD | prd 環境の AWS IAM User のアクセスシークレット |
| NEW_RELIC_API_KEY_DEV | dev 環境の New Relic API Key |
| NEW_RELIC_API_KEY_STG | stg 環境の New Relic API Key |
| NEW_RELIC_API_KEY_PRD | prd 環境の New Relic API Key |
| SLACK_WEBHOOK | Slack の incoming webhook URL |
AWS_ACCESS_KEY_IDやAWS_SECRET_ACCESS_KEYは、tfstate を S3 に保管しているため設定しています。これらを発行している IAM User は当該 S3 へのアクセス権限のみを付与したものとなっています。
resource "aws_iam_policy" "terraform-newrelic-ci-user-policy" {
  name        = "terraform-newrelic-ci-user-policy"
  path        = "/"
  description = "Allows users to manage terraform-newrelic state file."
  policy = jsonencode({
    Version = "2012-10-17"
    Statement = [
      {
        Sid    = ""
        Effect = "Allow"
        Action = [
          "s3:PutObject",
          "s3:GetObject"
        ]
        Resource = [
          aws_s3_bucket.terraform-state-newrelic.arn,
          "${aws_s3_bucket.terraform-state-newrelic.arn}/*"
        ]
      },
    ]
  })
}
以降、上記の GitHub Actions ファイル内での詳細を紹介していきます。
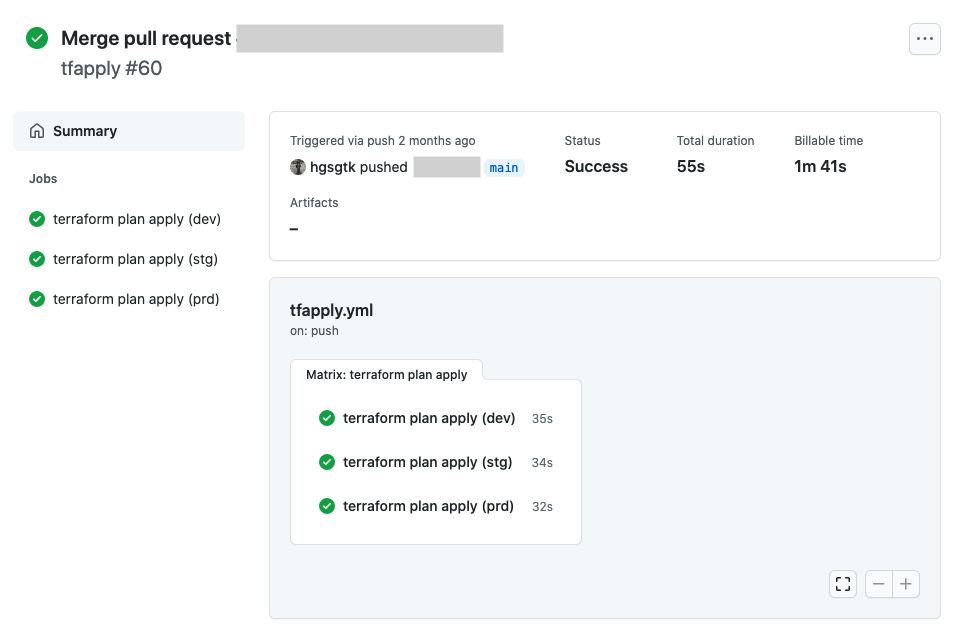
複数環境はjobs.<job_id>.strategy.matrixで対応
BASE BANK チームでは前述したとおり、development/staging/production の 3 アカウントを用意しています。それぞれの環境に対して CI/CD パイプラインが組むために GitHub Actions の syntax jobs.<job_id>.strategy.matrix を利用しています。
    # (省略)
    strategy:
      matrix:
        env: [dev, stg, prd]
      # (省略)
      - name: Terraform init
        id: init
        run: terraform init
        working-directory: ./${{ matrix.env }}
      # (省略)
directory 構成は前述したとおり dev/stg/prd とサブディレクトリを切っている構成としており各ディレクトリ配下にmain.tfをおいています。
.
├── dev // BANK-development
├── modules // 全環境共通モジュール
├── prd // BANK-production
└── stg // BANK-staging
working-directoryにて matrix で指定した環境名を指定することで dev での実行の場合は dev ディレクトリ配下となるようにしています。
jobs.<job_id>.strategy.matrix を使用した場合は dev/stg/prd へのフローは並列に実行されます。dev/stg を先に確認してから prd を実行したいニーズが強い場合はデメリットとなりますが、New Relic の設定管理ではそのデメリットは許容しうると考えこの構成としています。
Job outputsでのjob間の値受け渡し
GitHub Actions では Job outputs という syntax を用いることで、job 間の値の受け渡しができます。具体的にはjobs.<job_id>.outputsという syntax です。
この機能を用いて matrix ごとに使用する設定情報のハンドリングを行っています。
- 環境ごとに set-output で outputs を定義
- id=config で定義した outputs を別ステップで参照
      # Step1. 環境ごとにset-outputでoutputsを定義
      - name: Define Configuration
        id: config
        run: |
          if [[ ${{ matrix.env }} = 'dev' ]]; then
            echo ::set-output name=aws-access-key-id::${{ secrets.AWS_ACCESS_KEY_ID_DEV }}
            echo ::set-output name=aws-secret-access-key::${{ secrets.AWS_SECRET_ACCESS_KEY_DEV }}
          // ... (省略)
          else
            echo 'unsupported matrix environment'
            exit 1
          fi
      # Step2. id=configで定義したoutputsを別ステップで参照
      - name: Configure AWS Credentials
        uses: aws-actions/configure-aws-credentials@v1
        with:
          aws-access-key-id: ${{ steps.config.outputs.aws-access-key-id }}
          aws-secret-access-key: ${{ steps.config.outputs.aws-secret-access-key }}
          aws-region: ap-northeast-1
echo ::set-output name=key::valueとすることで Job outputs に値を設定できます。当該 job に id を設定することで以降のステップで参照できます。
aws-access-key-id: ${{ steps.config.outputs.aws-access-key-id }}
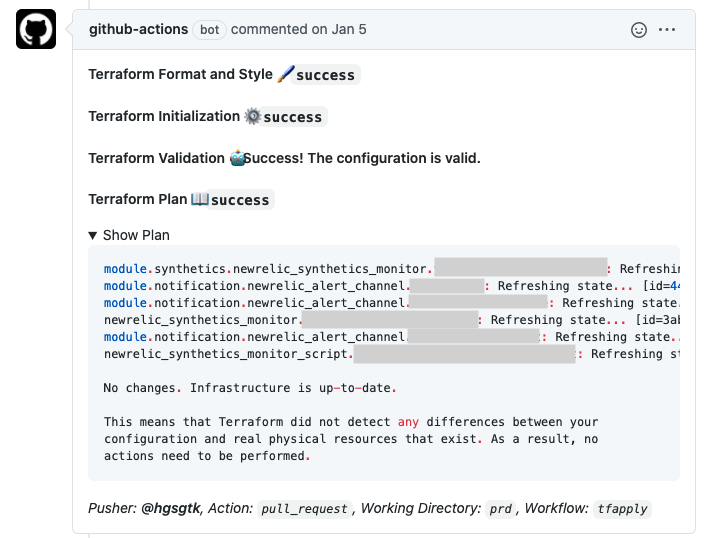
terraform init/validate/plan結果のPRコメント
毎回 PR 作成ごとに手元で plan した結果をコメントに貼るのは大変なので、自動で PR コメントに記載してくれるようにしています。当記事内では hashicorp/setup-terraform 内の usage にあるサンプルを活用しています。
ここでは、terraform init/validate/plan の結果を先ほど紹介した Job outputs から取得できる標準出力を活用して、PR コメント内容を作成しています。
      - uses: actions/github-script@v3
        if: github.event_name == 'pull_request'
        env:
          PLAN: "terraform\n${{ steps.plan.outputs.stdout }}"
        with:
          github-token: ${{ secrets.GITHUB_TOKEN }}
          script: |
            const output = `#### Terraform Format and Style 🖌\`${{ steps.fmt.outcome }}\`
            #### Terraform Initialization ⚙️\`${{ steps.init.outcome }}\`
            #### Terraform Validation 🤖${{ steps.validate.outputs.stdout }}
            #### Terraform Plan 📖\`${{ steps.plan.outcome }}\`
            <details><summary>Show Plan</summary>
            \`\`\`${process.env.PLAN}\`\`\`
            </details>
            *Pusher: @${{ github.actor }}, Action: \`${{ github.event_name }}\`, Working Directory: \`${{ matrix.env }}\`, Workflow: \`${{ github.workflow }}\`*`;
            github.issues.createComment({
              issue_number: context.issue.number,
              owner: context.repo.owner,
              repo: context.repo.repo,
              body: output
            })
注意点としては-no-colorオプションを付けておかないと通知内容が文字化けしてしまいます。
      - name: Terraform plan
        run: terraform plan -no-color
        # (省略)
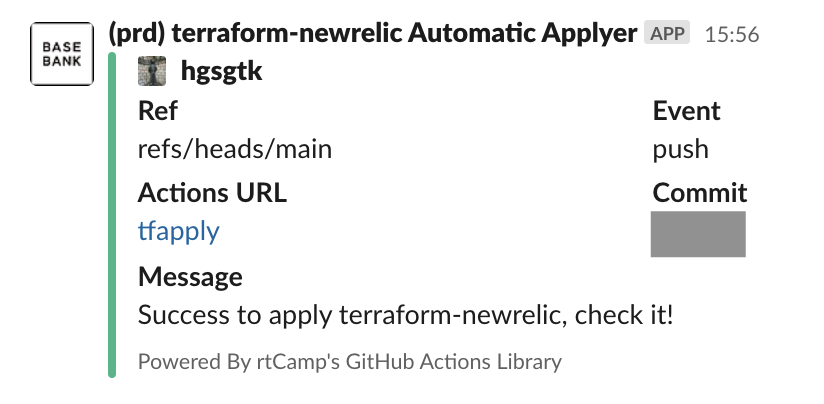
Slack通知
rtCamp/action-slack-notify を用いて成功時・失敗時に Slack 通知を行っています。
成功時の Slack 通知はこのようになっています。
      - name: Slack notification (applying success)
        uses: rtCamp/action-slack-notify@v2
        if: ${{ github.event_name == 'push' && success() }}
        env:
          SLACK_USERNAME:  (${{ matrix.env }}) terraform-newrelic Automatic Applyer
          SLACK_ICON: # IconのURL
          SLACK_MESSAGE: Success to apply terraform-newrelic, check it!
          SLACK_COLOR: good
          # https://base.slack.com/services/1633237925184?updated=1
          SLACK_WEBHOOK: ${{ secrets.SLACK_WEBHOOK }}
この設定で以下のように Slack 通知できます。
おわりに
New Relic One を活用する際に Terraform の初期設定を紹介いたしました。3rd Party Provider を利用する際の初期設定や GitHub Actions を用いた CI/CD Pipeline の作成事例として参考になれば幸いです。
New Relic 等を活用したオブザーバビリティの実践によるサービス品質の向上に興味のある方は、ぜひカジュアルにお話しましょう。@hgsgtkに DM 頂いても構いません。
では、また来月もこちらのブログでお会いしましょう。