BASE株式会社 Owners Experience Frontend チームのパンダ(@Panda_Program)です。
BASE では社内用コンポーネントライブラリ「BBQ」を使ってフロントエンドの開発をしています。
BBQ は Vue2 + Storybook v5 で作成されていましたが、TypeScript Compiler API と社内のフロントエンドエンジニアの有志たちのおかげで Storybook のバージョンを最新の v6.3 にする対応が完了しました。
以前執筆した「Vue2 + Storybook v5 のコンポーネントを v6 向けに書き換える」 という記事で、Storybook v5 から v6 の書き方である Component Story Format(CSF) への変更手順を確認しました。
この記事では、TypeScript Compiler API を使って前回の記事で紹介した書き換えをスクリプトで自動実行した話を紹介します。
前置き
率直な意見を書くと、TypeScript Compiler API(以下、Compiler API)はとっつきにくいです。なぜなら、初めて出会う単語や概念がたくさんあるからです。さらに、それをコードで操作するので慣れるまでは書きにくいし読みにくいです。
記事の途中で出てくる単語の意味が分からなくても、途中でコードの input と output の例を多めに掲載するので文章は読み飛ばしてもらっても大丈夫です。
TypeScript Compiler APIとは何か
TypeScript Compiler API(以下、Compiler API) とは、TypeScript の Compiler を操作するための API です。 つまり、TS/JS のコードを解析したり、TS を JS に変換したり、コードの文法エラーを検出するといったコンパイラの機能を利用するための API です。
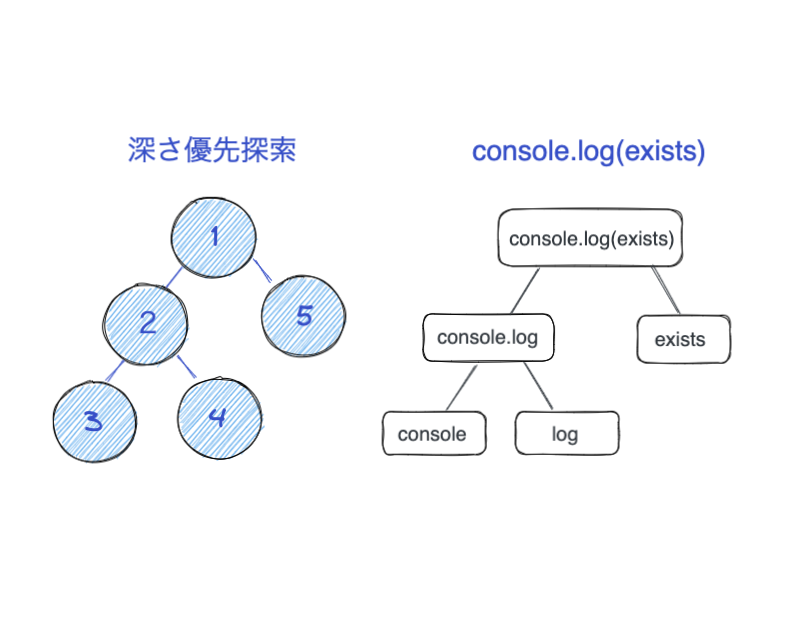
Compiler API の機能は多岐に渡りますが、今回利用したのは大きく分けて AST(Abstract Syntax Tree。抽象構文木) の走査(AST という木構造のデータを深さ優先探索で順番に見て回ること)、ファクトリ関数によるコード生成、visitor によるコードの部分的書き換えの3点です。
Compiler API で実現できること
百聞は一見に如かずです。CSF への書き換えに用いたスクリプト(以下、「書き換えスクリプト」または「置換スクリプト」)を使って、「Vue2 + Storybook v5 のコンポーネントを v6 向けに書き換える」 で紹介した storiesOf で記述しているコンポーネントを置換してみましょう。
こちらが変換元のコンポーネントです。
// bbq/stories/v5/elements/button-group.stories.js

import { action } from '@storybook/addon-actions'
import { number, select, text, withKnobs } from '@storybook/addon-knobs'
import { storiesOf } from '@storybook/vue'
import { withInfo } from 'storybook-addon-vue-info'

import { ButtonGroup } from '../../elements/buttonGroup/button-group.vue'
import README from '../../elements/buttonGroup/README.md'
import { devices } from '../../values/Devices'

// Storybook コンポーネント名
const buttonStories = storiesOf('Elements/ButtonGroup', module)

buttonStories
  // addon-knob
  .addDecorator(withKnobs)
  // addon-info
  .addDecorator(withInfo)
  .add(
    'ButtonGroup',
    () => {
      return {
        components: { ButtonGroup },
        // Vue Template
        template: `
          <div :class="'theme-'+device">
            <p>
              <h2>デフォルト</h2>
              <div>アイコン+ラベル</div>
              <bbq-button-group :tag="tag" :items="iconsAndLabels" @change="({index}) => {this.selected = index; change(index)}" :selected="selected" :width="width"/>
              <div>アイコン</div>
              <bbq-button-group :tag="tag" :items="icons" @change="({index}) => {this.selected = index; change(index)}" :selected="selected" :width="width"/>
              <div>ラベル</div>
              <bbq-button-group :tag="tag" :items="labels" @change="({index}) => {this.selected = index; change(index)}" :selected="selected" :width="width"/>
            </p>
            <p>
              <h2>カスタムUI</h2>
              <bbq-button-group :tag="tag" :items="['a','b', 'c', 'd']" @change="({index}) => change(index)" :selected="selected" :width="width">
                <template v-slot="{items, change}">
                  <button v-for="(item, index) in items" @click="change(index)">
                    {{item}}: {{index}}
                  </button>
                </template>
              </bbq-button-group>
            </p>
          </div>
        `,
        // Data
        data() {
          return {
            device: select(`device`, devices, 'pc'),
            selected: number('selected', 0),
            width: select('width', ['', 'full']),
          }
        },
        // Props
        props: {
          tag: { default: text('tag', 'ul') },
        },
        // Computed
        computed: {
          icons() {
            return [{ icon: 'list' }, { icon: 'grid' }]
          },
          labels() {
            return [{ label: 'ドラッグで並び替え' }, { label: '数値で並び替え' }]
          },
          iconsAndLabels() {
            return [
              { icon: 'list', label: 'リストで並び替え' },
              { icon: 'grid', label: 'グリッドで並び替え' },
              { icon: 'attentionCircle', label: '念で並び替え' },
            ]
          },
        },
        // methods
        methods: {
          change: action('change'),
        },
      }
    },
    // Parameters
    {
      notes: README,
    }
  )
置換スクリプトを実行することで、このコンポーネントが以下のように書き変わります。
// bbq/stories/v6/elements/button-group.stories.js

import { action } from '@storybook/addon-actions'
import { number, select,  withKnobs } from '@storybook/addon-knobs'
import { ButtonGroup } from '../../elements/buttonGroup/button-group.vue'
import { devices } from '../../values/Devices'
import README from './README.md'

export default {
    title: "V6/Elements/ButtonGroup",
    component: ButtonGroup,
    parameters: {
        notes: { README },
        docs: {
            extractComponentDescription: ((_, { notes }) => notes?.README)
        }
    },
    argTypes: {
        device: {
            options: devices,
            control: { type: "select" }
        },
        width: {
            options: ["", "full"],
            control: { type: "select" }
        }
    }
};

const Template = (args, { argTypes }) => ({
    components: { ButtonGroup },
    props: Object.keys(argTypes),
    template: `
          <div :class="'theme-'+device">
            <p>
              <h2>デフォルト</h2>
              <div>アイコン+ラベル</div>
              <bbq-button-group :tag="tag" :items="iconsAndLabels" @change="({index}) => {this.selected = index; change(index)}" :selected="selected" :width="width"/>
              <div>アイコン</div>
              <bbq-button-group :tag="tag" :items="icons" @change="({index}) => {this.selected = index; change(index)}" :selected="selected" :width="width"/>
              <div>ラベル</div>
              <bbq-button-group :tag="tag" :items="labels" @change="({index}) => {this.selected = index; change(index)}" :selected="selected" :width="width"/>
            </p>
            <p>
              <h2>カスタムUI</h2>
              <bbq-button-group :tag="tag" :items="['a','b', 'c', 'd']" @change="({index}) => change(index)" :selected="selected" :width="width">
                <template v-slot="{items, change}">
                  <button v-for="(item, index) in items" @click="change(index)">
                    {{item}}: {{index}}
                  </button>
                </template>
              </bbq-button-group>
            </p>
          </div>
        `,
    methods: {
        change: action("change"),
    }
});

export const Default = Template.bind({})
Default.args = {
    device: select(`device`, devices, "pc"), selected: 0, width: select("width", ["", "full"]),
    selected: 0,
    tag: "ul"
};
プロパティの重複や改行の不足もありますが、あえてありのまま記述しています。
Compiler API を使ったスクリプトを実行することでコードを劇的に書き換えられます。 これでCompiler API の威力を実感していただけたかと思います。
Storybook の書き換えに Compiler API を使った動機
さて、書き換えスクリプトの詳細に入る前に Compiler API で書き換え対応した理由を説明します。
想定読者はエンジニアなので早めに技術の話に入りたいのですが、Compiler API での書き換え実行に至った背景は普遍的なはずなので共有する価値があると考えています。
以下、Storybook の書き換えに Compiler API を使った理由を箇条書きで記述します。大きな目的は「Storybook の v5 から v6 へのバージョンアップを楽に実行すること」ですが、Compiler API を採用したのは以下のような背景があります。
- 書き換え作業にまとまった時間と人が確保できないこと(人海戦術ができない)
- BBQ というコンポーネントライブラリの保守・メンテは数人の有志者(以下、メンテナー)がスキマ時間に行なっている
- 体制として、例えば20%ルールなどの負債解消の時間を設けていない
- Storybook のバージョンアップは喫緊の課題でもないのでプロジェクト化されない
- ファイル数が多いこと
- BBQ の Storybook のコンポーネントは60ファイル
- BBQ の他にも Storybook を利用しているレポジトリがあるため、置換スクリプトを書くと再利用できる
簡潔に書くと、手作業による書き換え作業コストはファイル数に応じて比例しますが、スクリプトを適用できるのであればコストのほとんどはスクリプト作成だけで済むため、トータルコストが抑えられると判断して Compiler API での書き換えを採用しました。
またメンテナーに書き換えタスクを割り振って手作業で対応する場合は、新しい書き方を決定したり、書き換え方がわからないケースの調査結果の共有やコードレビューといったコミュニケーションコストが発生します。さらにそれらは往々にして同期的なものです。
このようなコミュニケーションコストを最小限にするために、書き換え方や気をつけるポイントを自分でドキュメント化して他の方に共有しました。これによりコミュニケーションを非同期化することができ、各自のタスクに集中できます。
書き換えの作業コストのイメージを可視化すると以下のようになります。

書き換えスクリプトを使うと、最も簡単なケースでは、あるファイルを置換した後 Storybook で動作確認を完了するまで1分もかかりませんでした。
置換スクリプトで除外したケース
ただし、スクリプトで細かいケースまで全部対応するのは実装コストが高くなるだけです。先程紹介した重複プロパティを削除する、などちょっとしたところであればあえて自動化しないという局所的な判断もしています。
また、1つのファイル内でforEachを記述して複数の storiesOf を実行しているようなパターンもスクリプトでの対象外としています。
['blue', 'red', 'green'].forEach((color) => {
  const component = storiesOf(...)
})
このケースは、コードを書くより人の手で書き換えた方が早いと判断してメンテナーに割り振って対応してもらいました。
結果、60ファイル中置換で対応できたのが40ファイル、人の手で書き換えたのが15件ほどでした(15件のうち半分は TSX で書かれており、また残り5件は元から CSF でした)。
書き換えのスケジュール
スケジュールは以下のように進みました。
1,2週間目: スキマ時間でCompiler API、Storybook v6 対応調査、書き換えスクリプト作成と調整 3週間目: スクリプトを実行して一括置換し、自分を含むメンテナに微調整タスクを割り振り 4週間目: PRレビュー依頼、コメント対応 5週目: 動作確認、Storybook v6 化リリース
最初の2週間は自分一人で動き、3週間目からはメンテナーの有志たちの力を借りました。量としては一人でも対応できるものだったのですが、v6 化にあたって知識の俗人化を避けるためにレビューも含めみんなで対応しました。
以上、置換スクリプトで「何ができるか」「なぜ Compiler API を使ったのか」「どのような背景があったのか」はお伝えできたかと思います。
Compiler API を使ったファイル書き換えの流れ
早速置換スクリプトの中身に入っていきたいところですが、まずは Compiler API を使った処理の大まかな流れをお伝えします。
Compiler API でファイルを書き換える処理自体は簡単です。大まかな流れは以下のようなものです。
- ファイルをメモリに保持する
- AST を解析する
- 特定の箇所を書き換える
- 書き換えた値をメモリからファイルに出力する
これをコードで表現するためにミニプログラムを作成します。
ここでは説明のために「読み込んだファイルのimport 文だけ抜き出す」というシンプルな処理だけをしています。
import * as ts from "typescript"
import * as fs from 'fs'

// 1. ファイルを入力してメモリに保持する
const code = fs.readFileSync('./input.js', 'utf8')
const outputFilename = './output.js'
const sourceFile = ts.createSourceFile(outputFilename, code, ts.ScriptTarget.Latest)

const imports: string[] = []

// 2. AST を解析する
function printRecursive(node: ts.Node, sourceFile: ts.SourceFile) {
  const text = node.getText(sourceFile)

  // node の解析結果を出力する(後述)
  const syntaxKind = ts.SyntaxKind[node.kind]
  const textWithSyntaxKind = `${syntaxKind}: ${text}`
  console.log(textWithSyntaxKind)

  // 3. 特定の箇所を書き換える
  if (ts.isImportDeclaration(node)) {
    imports.push(text)
  }

  node.forEachChild(child => {
    printRecursive(child, sourceFile)
  })
}

printRecursive(sourceFile, sourceFile)

// 4. 書き換えた値をメモリからファイルに出力する
fs.writeFileSync(outputFilename, imports.join('\n'))
このコード例では文字列を抜き出しているため、Compiler API をご存知の方は少し変だと感じるかもしれません。なぜなら、eslint の plugin などでは「ASTを解析し、特定のパターンのASTを書き換えた後、printer.printNode で文字列に変換する」処理が一般的だからです。
ただ、storiesOf の書き方と CSF では構造が大いに異なるため、置換スクリプトではコードの場所に応じて使い分けています。
例えば、import 文では上記のように配列と文字列で扱い、export default { title: 'SomeComponent' } のようなオブジェクトの箇所では AST を操作する形にしています。
Compiler API を使ったことがない方が大半だと思うので、今回は2つのうち簡単な方をコード例に挙げました。
ミニプログラムを実行する
さて、このミニプログラムを実行してみましょう。入力と実行結果は以下のようになります。
入力
// input.js
import * as path from "path"
import * as fs from 'fs'

const exists = fs.existsSync(path.resolve() + '/input.js')

console.log(exists);
実行結果
// output.js
import * as path from "path"
import * as fs from 'fs'
また、プログラムの途中に仕込んだconsole.log(textWithSyntaxKind)の出力は以下のようになります。
このままでは読みにくいと思うので、今回抜き出しの対象とした import 文があるところにコメントを追加します。#より右は出力結果はではなく追加したコメントです。
SourceFile: import * as path from "path"  # ソースファイル全体
import * as fs from 'fs'

const exists = fs.existsSync(path.resolve() + '/input.js')

console.log(exists);

ImportDeclaration: import * as path from "path"  # import 文
ImportClause: * as path
NamespaceImport: * as path
Identifier: path
StringLiteral: "path"
ImportDeclaration: import * as fs from 'fs'  # import 文
ImportClause: * as fs
NamespaceImport: * as fs
Identifier: fs
StringLiteral: 'fs'
FirstStatement: const exists = fs.existsSync(path.resolve() + '/input.js')
VariableDeclarationList: const exists = fs.existsSync(path.resolve() + '/input.js')
VariableDeclaration: exists = fs.existsSync(path.resolve() + '/input.js')
Identifier: exists
CallExpression: fs.existsSync(path.resolve() + '/input.js')
PropertyAccessExpression: fs.existsSync
Identifier: fs
Identifier: existsSync
BinaryExpression: path.resolve() + '/input.js'
CallExpression: path.resolve()
PropertyAccessExpression: path.resolve
Identifier: path
Identifier: resolve
PlusToken: +
StringLiteral: '/input.js'
ExpressionStatement: console.log(exists);
CallExpression: console.log(exists)
PropertyAccessExpression: console.log
Identifier: console
Identifier: log
Identifier: exists
EndOfFileToken:
深さ優先探索で AST の node を一つずつ辿っている様子が分かります。
例えば、console.log(exists)という箇所は以下のように解析されています。
CallExpression: console.log(exists)
PropertyAccessExpression: console.log
Identifier: console
Identifier: log
Identifier: exists

また、この出力結果を見ると、なぜts.isImportDeclaration(node)というメソッドで import 文を判定できるかわかると思います。
それは、import * as path from "path"がImportDeclarationであると判定されるからですね。
これで大まかな動きはイメージしてもらえるかなと思います。
Compiler API を使った置換スクリプトの中身を紹介します
では、実際に置換スクリプトの中身を紹介しようと思います。
ただし、書き捨てのコードであるため書きやすさ重視でコード量が多く、極力整理はしたもののあまり洗練されていないコードになっています。
そこで、置換スクリプトと Compiler API のエッセンスが伝わるような箇所を2つ抜き出して紹介しようと思います。
import 文の書き換え
1つ目は、元ファイルから import 関連の文字列を抜き出して少し書き換える処理です。
まずは変換前と変換後を紹介します。
// 変換前
import { action } from '@storybook/addon-actions'
import { number, select, text, withKnobs } from '@storybook/addon-knobs'
import { storiesOf } from '@storybook/vue'
import { withInfo } from 'storybook-addon-vue-info'

import { ButtonGroup } from '../../elements/buttonGroup/button-group.vue'
import README from '../../elements/buttonGroup/README.md'
import { devices } from '../../values/Devices'
// 変換後
import { action } from '@storybook/addon-actions'
import { number, select,  withKnobs } from '@storybook/addon-knobs'
import { ButtonGroup } from '../../elements/buttonGroup/button-group.vue'
import { devices } from '../../values/Devices'
import README from './README.md'
変換ポイントは以下の通りです。
@storybook/addon-knobsから import している text を削除storiesOf、withInfoの import を削除READMEの import パスを書き換える
これを実現するためのコードは以下の通りです。説明のために処理を先程のミニプログラムに組み込みます。
import * as ts from "typescript"
import * as fs from 'fs'

const code = fs.readFileSync('./input.js', 'utf8')
const outputFilename = './output.js'
const sourceFile = ts.createSourceFile(outputFilename, code, ts.ScriptTarget.Latest)

const imports: string[] = []
let hasReadme = false

function printRecursive(node: ts.Node, sourceFile: ts.SourceFile) {
  const text = node.getText(sourceFile)

  if (ts.isImportDeclaration(node)) {
    imports.push(text)

    if (text.includes('README')) {
      hasReadme = true
    }
  }

  node.forEachChild(child => {
    printRecursive(child, sourceFile)
  })
}

printRecursive(sourceFile, sourceFile)

// import 文を書き換える
function getFilteredImport(imports: string[], hasReadme: boolean): string {
  // filter で不要な import を削除し、
  // concat で必要な import を追加する
  let filtered: string[] = imports
    .filter(item => !item.includes('storiesOf'))
    .filter(item => !item.includes('storybook-addon-vue-info'))

  // README が存在したらパスを書き換える
  if (hasReadme) {
    filtered = filtered
      .filter(item => !item.includes('README'))
      .concat(`import README from './README.md'`)
  }

  return filtered.join("\n")
    .replace('withKnobs,', '')
    .replace("import { withKnobs } from '@storybook/addon-knobs'\n", '') // knob は `preview.js`で読み込むので不要
    .replace('text,', '')      // knob の text を削除
}

const filteredImport = getFilteredImport(imports, hasReadme)

// ファイルとして出力する
const newFile = `${filteredImport}`
fs.writeFileSync(outputFilename, newFile)
変数 imports は string の配列なので、concat と filter を使って追加と削除をしています。
この処理は、元ファイルの import 文をほぼ流用できるのでこのような愚直な実装にしています。次は、元ファイルの情報を使い回せない場合の処理方法を紹介します。
export default の追加
次に、AST を生成する方法を紹介します。CSF ではコンポーネントのメタ情報をオブジェクトとして default export します。これは storiesOf の書き方とは全く似ていません。
// storiesOf
const buttonStories = storiesOf('Elements/ButtonGroup', module)
// v6 の書き方
export default {
    title: "V6/Elements/ButtonGroup",
    component: ButtonGroup,
}
何か流用できるものはないかと探しながら前後を見比べると、ストーリー名だけは利用できることがわかります。
変更前のファイルからストーリー名を抜き出してV6という接頭辞をつけてストーリー名を差別化し、コンポーネント名はストーリー名から抜き出せれば OK です。
これをコードで実現していきます。前出のコードに追記していきます。
import * as ts from "typescript"
import * as fs from 'fs'

const code = fs.readFileSync('./input.js', 'utf8')
const outputFilename = './output.js'
const sourceFile = ts.createSourceFile(outputFilename, code, ts.ScriptTarget.Latest)

const imports: string[] = []
let hasReadme = false
// 以下を追加
let prevText = ""
let title = ''
let component = ''

  // SB コンポーネント名
const isPrevStoriesOf = (text: string) => text === 'Identifier: storiesOf'
const includesStorybook = (text: string) => text.includes('storybook')

function printRecursive(node: ts.Node, sourceFile: ts.SourceFile) {
  const text = node.getText(sourceFile)
  const syntaxKind = ts.SyntaxKind[node.kind]
  const textWithSyntaxKind = `${syntaxKind}: ${text}`

  // import 文
  if (ts.isImportDeclaration(node)) { ... }

  // Storybook コンポーネント名を抜き出す(後述)
  if (isPrevStoriesOf(prevText) && !includesStorybook(text)) {
    // クォーテーションを削除
    title = text.substring(1, text.length - 1)
  }

  // 一つ前の node を文字列でメモする
  prevText = textWithSyntaxKind

  node.forEachChild(child => {
    printRecursive(child, sourceFile)
  })
}

printRecursive(sourceFile, sourceFile)

// import 文を書き換える
function getFilteredImport(imports: string[], hasReadme: boolean): string {...}
const filteredImport = getFilteredImport(imports, hasReadme)

// コンポーネント名を抜き出す
component = title.split('/').pop() || ''

if (!component) {
  throw new Error('Component 名を取得できません。')
}

// 以下の2つの関数を組み合わせて export default の AST を作成する
function getExportAssignmentProperties(title: string, component: string) {
  const properties: ts.ObjectLiteralElementLike[] = [
    ts.factory.createPropertyAssignment(
      ts.factory.createIdentifier("title"),
      ts.factory.createStringLiteral(title)
    )
  ]

  properties.push(
    ts.factory.createPropertyAssignment(
      ts.factory.createIdentifier("component"),
      ts.factory.createIdentifier(component)
    )
  )

  return properties
}

function createExportAssignmentAst(node: ts.ObjectLiteralElementLike[]) {
  return ts.factory.createExportAssignment(
    undefined,
    undefined,
    undefined,
    ts.factory.createObjectLiteralExpression(
      node,
      true
    )
  )
}

// 元の Storybook コンポーネント名と区別するために V6 でディレクトリを分ける
const storybookComponentTitle = `V6/${title}`
const properties = getExportAssignmentProperties(storybookComponentTitle, component)
const exportAssignmentAst = createExportAssignmentAst(properties)

// printer
const printer = ts.createPrinter()
const printNode = (node: ts.Node) => printer.printNode(
  ts.EmitHint.Unspecified,
  node,
  ts.createSourceFile('', '', ts.ScriptTarget.Latest),
)

const exportAssignment = printNode(exportAssignmentAst)

// ファイルとして出力する
const newFile = `${filteredImport}

${exportAssignment.normalize('NFC')}
`

fs.writeFileSync(outputFilename, newFile)
import 文の処理より複雑なので、ポイントを解説していきます。
直前に出てきた要素を prevText にメモしておく
コンポーネント名だけを抜き出すために、printRecursive という再帰関数の中でprevText という変数に直前の node の名前を保存するようにしました。
以下のコードを解析するとその下のような結果になるため、直前の node の情報が必要なのです(関係のある箇所だけ抜き出しています)。
const buttonStories = storiesOf('Elements/ButtonGroup', module)
CallExpression: storiesOf('Elements/ButtonGroup', module)
Identifier: storiesOf
StringLiteral: 'Elements/ButtonGroup'
もしストレートに実装するなら「storiesOfの第一引数を抜き出す」という方法で良いのですが、少し試してもうまく取得できなかったので直前の要素を参照する形にしています。
今回抜き出したいのはコンポーネント名なのでStringLiteral: 'Elements/ButtonGroup'だけ使えれば良いです。
ただし、StringLiteral はただの文字列であるため import 文の from '@storybook/vue' のように他の場所でも出てくるので、isStringLiteralだけでは判定条件が不足してしまいます。
このため、storiesOf関数の第一引数は必ずストーリー名の string であり、AST の node を辿る順番は深さ優先探索であることを利用しようと考え、試行錯誤した結果以下のような記述方法になりました。
const isPrevStoriesOf = (text: string) => text === 'Identifier: storiesOf'
const includesStorybook = (text: string) => text.includes('storybook')

if (isPrevStoriesOf(prevText) && !includesStorybook(text)) {
  // クォーテーションを削除
  title = text.substring(1, text.length - 1)
}
isPrevStoriesOf は関数名の通り、直前がstoriesOfであるか判定します。includesStorybookはその node が以下のような import 文ではないことを判定しています。
import { storiesOf } from '@storybook/vue'
以上が、storiesOf('Elements/ButtonGroup', module) からコンポーネント名を抜き出す方法です。
factory.createExportAssignment でオブジェクトを default export する AST を作成する
次は default export するオブジェクトの作成です。
文字列操作でオブジェクトを作成するのはとても複雑です。このため、Compiler API の factory 関数を使いますが、factory 関数はたくさんあるため使い方を一つずつ知るのは大変です。
ここで裏技を使います。作成したいオブジェクトは以下のようなものだとわかっていましたね。
export default {
    title: "V6/Elements/ButtonGroup",
    component: ButtonGroup,
}
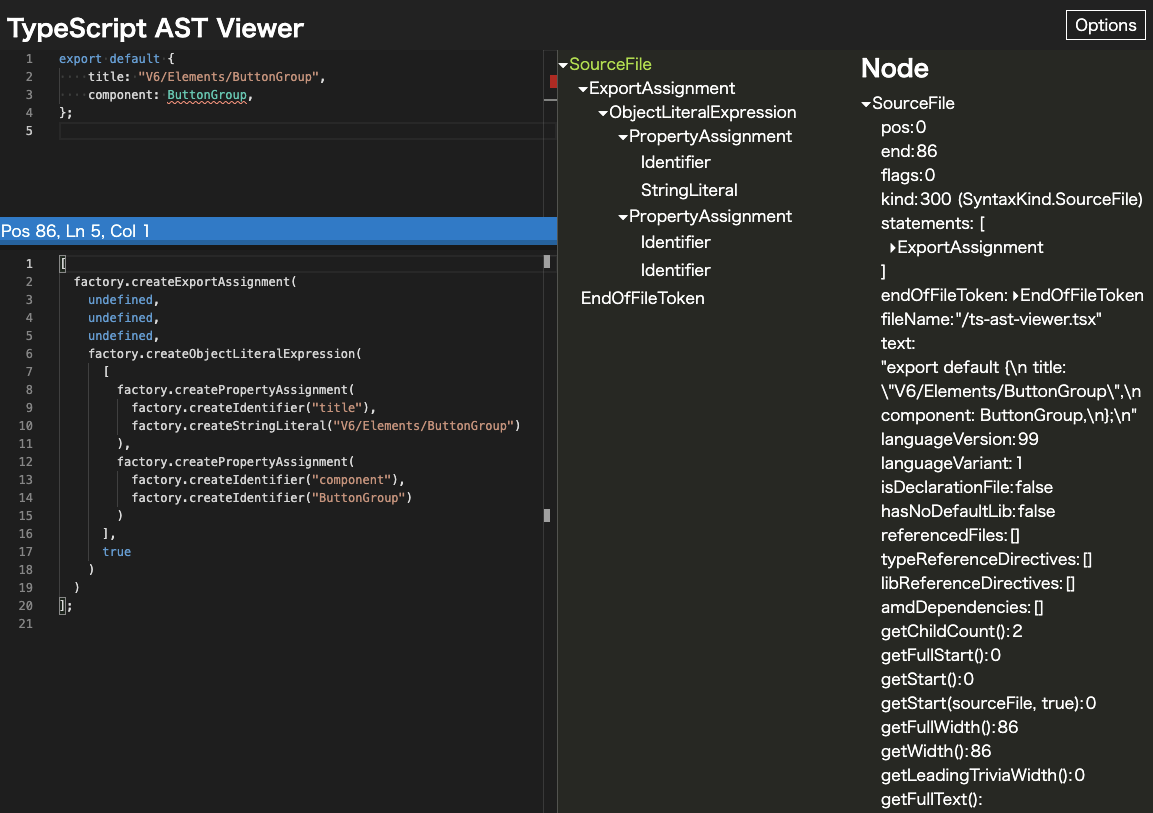
このコードから factory 関数を生成する手段があるのです。TypeScript AST Viewer を使えば関数の自動生成を実現できます。
サイトにアクセスし、左上の入力欄に作成したいコードを書き込めば左下に factory 関数が生成されます。

今回は以下のようなコードが出力されています。
[
  factory.createExportAssignment(
    undefined,
    undefined,
    undefined,
    factory.createObjectLiteralExpression(
      [
        factory.createPropertyAssignment(
          factory.createIdentifier("title"),
          factory.createStringLiteral("V6/Elements/ButtonGroup")
        ),
        factory.createPropertyAssignment(
          factory.createIdentifier("component"),
          factory.createIdentifier("ButtonGroup")
        )
      ],
      true
    )
  )
];
このコードを一度見てしまえば、変更すべき箇所は明白ですね。プロパティはそのままでいいので、ストーリー名V6/Elements/ButtonGroupとコンポーネント名ButtonGroupを変数化すればいいと分かります。
先述のコードで読みにくい関数が出てきたと思いますが、これはストーリー名とコンポーネント名を変数にする関数を作り、factory 関数をラップしているだけです。
function getExportAssignmentProperties(title: string, component: string) {
  const properties: ts.ObjectLiteralElementLike[] = [
    ts.factory.createPropertyAssignment(
      ts.factory.createIdentifier("title"),
      ts.factory.createStringLiteral(title)
    )
  ]

  properties.push(
    ts.factory.createPropertyAssignment(
      ts.factory.createIdentifier("component"),
      ts.factory.createIdentifier(component)
    )
  )

  return properties
}

function createExportAssignmentAst(node: ts.ObjectLiteralElementLike[]) {
  return ts.factory.createExportAssignment(
    undefined,
    undefined,
    undefined,
    ts.factory.createObjectLiteralExpression(
      node,
      true
    )
  )
}
createExportAssignmentAst の返り値である AST を printer で string に変換すれば、オブジェクトの default export が出力できます。
// printer。AST を string に変換する
const printer = ts.createPrinter()
const printNode = (node: ts.Node) => printer.printNode(
  ts.EmitHint.Unspecified,
  node,
  ts.createSourceFile('', '', ts.ScriptTarget.Latest),
)
const exportAssignment = printNode(exportAssignmentAst)
処理をまとめて書くと、以下のような単純なものだと理解できます。
const exportDefault = printNode(
  createExportAssignmentAst(
    getExportAssignmentProperties(
      'V6/Elements/ButtonGroup', 'ButtonGroup'
    )
  )
)
実際はargTypesやparametersをオブジェクトに追加するのでもう少し複雑になっていますが、基本的な考え方は以上の通りです。
なお、以下のようにオブジェクトをネストさせる書き方は今回は解説しません。詳しく知りたい方は実際のコードをご覧ください。
export default {
    // ...
    argTypes: {
        width: {
            options: ["", "full"],
            control: { type: "select" }
        }
    }
};
記述量は多いものの結局はプロパティと値の組み合わせなので、組み合わせ方さえわかってしまえば作成自体はそれほど難しくはないです。
終わりに
ここまで読んでくださってありがとうございました。コードを追うだけでも大変だったと思います。
実際に使った変換スクリプトはGitHub で公開しています。 コードコメントもそのまま残しているので生々しいと思います。
このスクリプトの目的は「BASE 社内の Storybook + Vue のコンポーネントを CSF に書き換える」ものなので、あまり一般化していません。
そのため、そのままスクリプトを流用しようとすると齟齬が出るかと思いますが、処理の流れを追ったり実装で詰まったところの対処法の参考にはしていただけるかなと思います。
TypeScript Compiler API の記事はほとんどなく、あったとしても記事内容が古かったり書き換えの全体像が見えにくかったり、再帰関数の中で部分的に書き換えるようなものが多かったです。
このため、公開しているコードは手探りの中で実装したコードであり、より良い書き方があるだろうということは書き添えておきます。ただ、拡張できるように綺麗に完璧に書くことは当初の目的から除外していたこと、全部 CSF に書き換わったので目的を達成して役目を終えたので、このようなコードもありかなと思います。
この書き換えスクリプトは私が入社して1~2ヶ月目の時で、アサインされたタスクをこなしつつ空いた時間で作成したものでした。試しに小さいスクリプトを書いて、これを応用すれば労力をかけずに Storybook のコンポーネントを置換できるとわかったタイミングでマネージャーに相談して、そのまま Go サインを出してもらったため完遂できたことだと思います。
転職してまだ日が浅かった上に、自分は慣れていない少しレベルの高い手段で、解決できるかわからない課題にチャレンジさせて貰えた環境とマネージャーの決断に感謝しています。
BBQの週次定例でメンテナーのみんなに置換スクリプトを披露し、「便利ですね」といってもらったことで方向が間違っていないことを確認でき、しっかりやり切ろうというモチベーションに繋がりました。
TypeScript Compiler API はうまく使うと人海戦術を避けられる強力な武器になるため、興味のある方は課題解決の手段としてぜひ試してみてください。
参考
- TypeScript AST Viewer
- AST Viewer です。コードを貼り付ければ AST やそのコードを生成するためのコードが表示されます
- Compiler API (TypeScript)
- TypeScript Compiler API の使い方がコードとともにわかりやすく紹介されているページです。
- TypeScriptのcompiler APIをいじる
- TypeScript CompilerAPI - 創出の落書帳 -
- TypeScript Compiler API を解説した書籍
- TypeScript Compiler APIを使って型を中心に実装を自動生成する